


How to install laminate flooring on a wooden subfloor?
Laminate flooring consists of multiple layers, and is a composite flooring material. Your home will look more attractive and stylish with laminate floors, which are best for decoration. The material can sometimes be made to resemble wood, but that doesn’t happen all the time. There are several types of laminate wood flooring available today, each with its own advantages and disadvantages. Unlike high-priced flooring, this type of flooring does not require much maintenance and has a unique design.
There is no need to install a subfloor before installing laminate flooring. This floor does not require glue. Installing it is as simple as clicking it onto the floor. Subfloors are prepared for the installation of laminate wood flooring. Among the topics we’ll cover in this article is How to install laminate flooring on a wooden subfloor?
It is possible to ensure good quality laminate floors on wood floors by following some methods. As a result of its bumps and ridges, these floors should be smooth and comfortable to walk on, making it easy for people to walk on. They should be installed so that walking on them does not hurt.
A List Of Installation Tools
- Jigsaw
- Mallet made of rubber
- Tapping block
- Pull bar
- Tape measure and pencil
- Combination square
Laminate floors should be installed on wooden subfloors according to these methods:
Lay Down Wooden Boards To Begin
- In the first step, you must lay down your wooden boards on the ground. The boards should be placed close to the main source of light in your room.
- Alternatively, if there is no main source of light, you should install the planks parallel to the wall. A uniform width is recommended for all boards.
- The pattern of the boards should be taken into consideration. The same thing should not be repeated on the floor in the same row. A natural look would be provided to your floor by this method.
The Installation Of Laminate Flooring
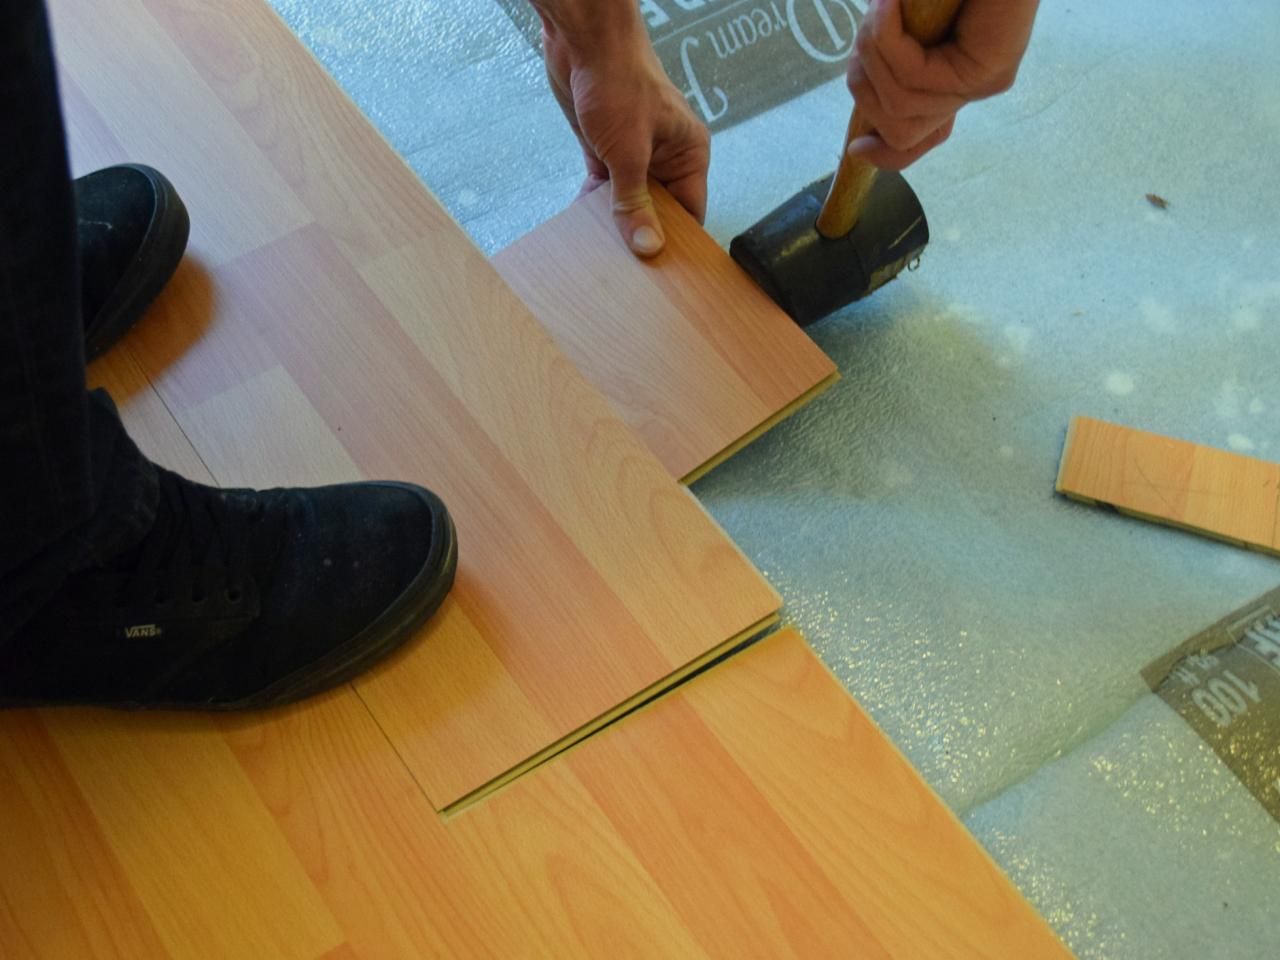
The mallet can be used when necessary during the installation process. An effective way of removing the ridged point on the floor near the wall is by using a jigsaw. From the face of the wall, you should install planks from left to right in the lengthwise direction. After the lengthwise direction has been set, place the planks and set them with pressure by hitting them with the mallet. Fixing and locking the planks will ensure that they stay in place.
Adding The Process To The Place By Clicking
Once you have added enough rows, you should proceed to work on the newly installed laminate flooring on top of the newly assembled rows. Before you lock the planks into place, position them over the original start rows before pulling them towards you. Keeping your eye on the right, you will now work in a clockwise direction.
You do not want any gaps between the joints, so make sure they are all tightly fitted. In the event that you find a loose joint or a plank that you cannot connect with another plank, you will need to stop and reconnect it. Be sure to cut the last rows as straight as possible. You can mark the cut if it is not straight. Take a scrap that has the full width and is about 3 to 4 inches long, and remove the ridged edge from the full board by setting it directly on top of the most recently installed row.
Mark the plank that sits on top of the last row with the pencil on the side. In order to avoid misplacing the planks after they have been cut to size, you might consider numbering them so you can remember which order to install them in. Your pull bar or crowbar will be necessary to install, depending on their size.
Subfloor Preparation
Preparing the existing plywood floor well is the key to creating an exquisite subfloor. To determine the square footage of your space, you first need to measure the dimensions and square footage of the floor.
The length of an irregularly shaped room may be calculated by dividing it into portions, measuring each, and adding them all up. You should buy 10 percent extra flooring when you are buying new flooring, in order not to run out. The carpeting or fabric layer that you currently have on your floor must be removed before preparing your new floor. You should wipe them off and keep them separate in order to prevent fabric particles from getting on your floor.
Your new floor needs to have enough space between its base and installed objects such as doors and furniture. Once this is done, ensure it has a sufficient gap between the floor and the installed objects. It may be necessary to cut through them if you don’t have that.
The Floor Needs To Be Cleaned
After you have cleaned your subfloor thoroughly, it is time to reinstall it. The floor can first be wiped clean with a mop. After that, you can use sandpaper to remove paint, wax, oil, or adhesive. Dust and debris left behind should be vacuumed off after this step.
Inspection Of The Floor
Your floor should be measured for moisture with a moisture meter after this has been completed. Make sure the readings are within the laminate flooring manufacturer’s specifications. Wood can be eaten by moisture, so drying the floor out if the level is too high is advised. If any floorboards are loose, you’ll need to secure them by screwing them into the floor supports. You will have uneven flooring and dips where the board is weak if you install your new floor directly.
Prepare The Subfloor By Creating A Guide
After you have done this, you can create a guide on your subfloor so that you can run a square floor. Mark the center of each wall on the subfloor after finding the center of the room.
Make an extension of these points toward the center of the room, using a pencil or chalk. Once you are finished, a cross should be visible in the center of the room.
To create your own guideline measurements, measure the distance from the cross to the starting wall. A guideline measurement is calculated after subtracting the manufacturer’s expansion gap from the original measurement.
In this case, the parallel centerline should be used to measure the distance between the starting wall’s ends and the parallel centerline. Draw a line connecting each new mark and use that as a guide to begin laying the floor.
Make Sure You Choose The Right Underlayment
You should use a flexible, thin, durable underlayment while installing laminate flooring. This underlayment will go onto your wood flooring, providing a base for the laminate tiles or planks that you plan to install. Unlike the subfloor, which serves as the foundation for your floor, the underlayment acts as a support layer for the flooring material. This improves and protects the floor at the same time.
Your underlayment can affect how your floor feels when you walk on it and how well it holds up over time if it’s not selected properly and installed correctly. A variety of factors must be taken into consideration when choosing an underlayment, including the environment, the type of floor, and the availability of space.
Conclusion
After installing a laminate floor, you can use it right away. Laminate flooring on the wooden subfloor is the best way to make your home or living area beautiful and attractive. Laminate floors are cheap in price than the other floors. So anyone with a low budget can use them. You can install laminate wooden flooring on a wooden subfloor by implementing all the points and guidelines that are discussed above in this article.